Dualboot encrypted Windows and Ubuntu
Tips and troubleshooting
So far i described just the installation of Windows and Ubuntu with encryption enabled. But what if an operating system won’t boot anymore because of a damaged boot sector? This part will describe some repair actions and tips which can be useful. For example if you already installed one operating system, but need some modifications to install another next to it. Besides you will find some tips about changing passwords and tuning/securing your system.
Enable Truecrypt multiboot option afterwards
Change the Truecrypt password for system encryption
Change the Truecrypt master key for system encryption
Repair the Truecrypt bootloader
Multiple partitions appear when using the Truecrypt multiboot option
Change the Ubuntu password for the crypto volume
Repair or reinstall the Grub Ubuntu loader
Cleanup old kernels when the boot partition is small
Enable Truecrypt multiboot option afterwards
Probably you have an already encrypted Windows system but did not enable the multiboot option yet. In that case you will not be mentioned about the escape button for multiboot functionality.

If the multiboot function is disabled you cannot use the Truecrypt boot manager with the escape key.
In case you like to install another operating system next to Windows you potentially need the multiboot option. No problem, you can enable the multiboot option afterwards.
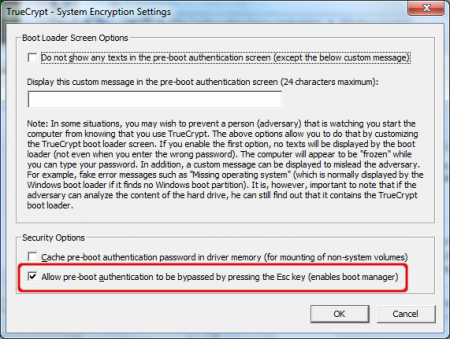
Select ‘Settings’ in the Truecrypt ‘System’ menu. You can enable or disable the multiboot function by checking or unchecking the ‘Allow pre-boot authentication to be bypassed pressing the Esc key (enables boot manager)’ option. Windows User Account control may ask you to confirm this change.
Change the Truecrypt password for system encryption
It is possible to change the password of the encrypted volume. Note that only the header key is changed, not the master key. The old rescue CD together with the old password still gives access to the encrypted volume because of the fact that the master key is not changed. So when you change the password, destroy your old rescue CD and create a new one based on your new password.
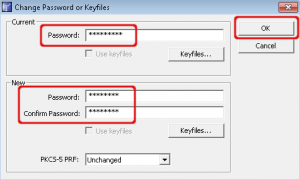
in Truecrypt select ‘system’, ‘change password…’. Enter your old and new password and hit OK. Remember that keyfiles are not supported using system encryption.
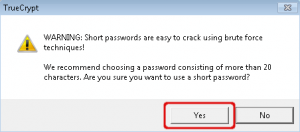
Truecrypt will warn you when using short passwords. Choose ‘No’ and invent a strong one or accept the risk and choose ‘Yes’.
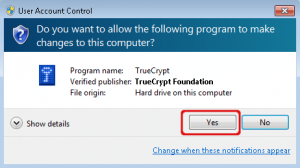
Windows User Account Control asks you to confirm changes to your computer.
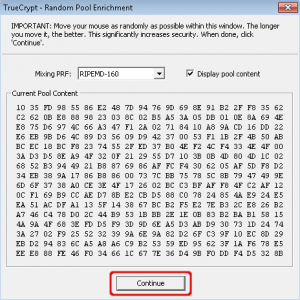
Random data will be collected for creating a new header key. Move your mouse inside this window for a while and select ‘Continue’.
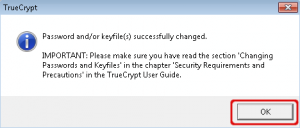
The password has changed. Truecrypt will notify you to read the documentation about changing passwords because of the security aspect of it.
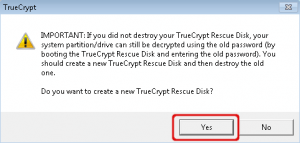
It is recommended to create a new rescue CD for recovery purposes. Select ‘Yes’ here. Besides you should destroy your old rescue CD. This is because the old rescue CD can restore the header key together with the old password. Cause is that only the header key is changed, not the master key.
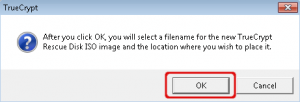
Click ‘OK’ to create a new image for the rescue CD.
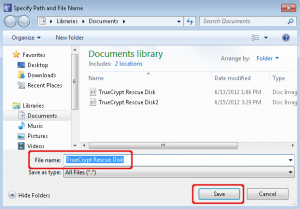
Select where to save the image file for the rescue CD.
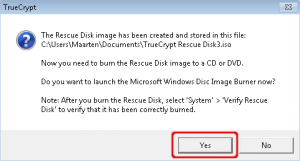
You can directly burn the rescue image to a CD. Select ‘Yes’ to start the burning software. Afterwards you can verify the rescue CD by selecting ‘Verify Rescue Disk’ from the ‘System’ menu.
Your password has changed now. Don’t forget to destroy your old rescue CD.
Change the Truecrypt master key for system encryption
Just changing the password on your system won’t be safe in all circumstances. As I mentioned before changing your password will only change the header key which is used to encrypt the master key. So when someone has a copy of your old rescue CD and your old password it is still possible to access the master key which is not changed. There is a solution for that, it is not that complicated but it takes some time.
If you want to change your master key you have to decrypt your system and re-encrypt it. Decrypting is available in the Truecrypt ‘System’ menu. Decrypting will restore the Windows boot loader in the master boot record. Also decrypting will takes a lot of time because of the fact that all the data in the system partition will be decrypted. Note that by removing the Truecrypt boot loader you will not be able to use the multiboot functionality for the moment. When finished decrypting you can use the system encryption wizard to start the encryption process again. A brand new volume key and master key will be generated, which makes your old rescue CD’s worthless. Also the Truecrypt bootloader will be re-installed which makes multiboot functionality available again.
Repair the Truecrypt bootloader
If your system doesn’t boot the Truecrypt loader you have to repair it. This can be done with the Truecrypt rescue CD. There are two items you have to repair. First the Truecrypt loader must be restored in the master boot record. Next the header key must be restored.
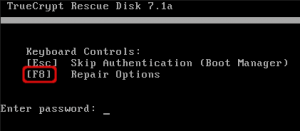
Start the computer with the rescue CD which you created during the encryption process. Hit the F8 key for the repair options.
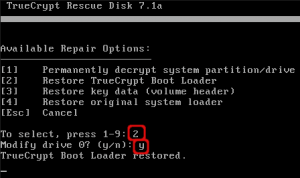
To restore the boot loader, choose option 2. Confirm that you modify the harddrive to restore the Truecrypt bootloader in the master boot record. Confirm with ‘y’. When the restore was successful hit the enter key to return to the repair options.
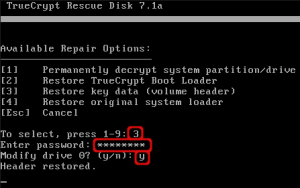
Last step is to restore the header key. In the repair options choose option 3. Enter your password used for encryption and confirm with ‘y’ to make modifications to your harddisk.
If this is all successful you should restart your system and be able to authenticate in the Truecrypt bootloader.
Multiple partitions appear when using the Truecrypt multiboot option
In some circumstances there will appear multiple partitions when hitting the escape button in the Truecrypt bootloader.
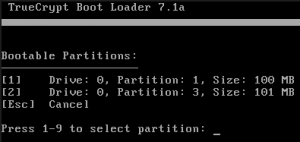
Multiple partitions appear. Select one of these partitions to continue booting.
There is no configuration option to set default booting to one or another partition. The Truecrypt loader just finds multiple partitions to boot and requests you to select one. This can only be avoided by designing a partition layout with a minimal amount of (bootable) partitions. Afterwards it is hard to make modifications to partition layouts, you must think about a partition layout before you start installing operating systems. Read the background information earlier this article for more information.
Change the Ubuntu password for the crypto volume
Changing the password of your crypto volume is a commandline based action. First you have to find out which device owns the encrypted volume. When you found the devicename you can change the password with ‘cryptsetup’ and the ‘luksChangeKey’ option. This option was not yet available with Ubuntu 10.04. In Ubuntu 10.04 it was required to create a new password and remove the old one. Crypto volumes with cryptsetup have multiple key slots which can hold passwords. So a new slot was used for the new password en you had to remove the password in the original slot. Now with Ubuntu 12.04 this new option is available to simply change the password in the current key slot.
To find the device that owns the encrypted volume we have to find the encrypted volume itself. You can find it inside the ‘/dev/mapper’ directory and has something like ‘crypt’ in it’s name. Type ‘ls -al /dev/mapper’ in a terminal and look for the encrypted device. Mine is called ‘sda5_crypt’ which is a symbolic link to ‘../dm-0’. You can forget about the symbolic link, just remember the encrypted devicename.
$ ls -al /dev/mapper/
total 0
drwxr-xr-x  2 root root     120 Jun 18  2012 .
drwxr-xr-x 15 root root    4120 Jun 18 13:57 ..
crw-------  1 root root 10, 236 Jun 18 13:57 control
lrwxrwxrwx  1 root root       7 Jun 18 13:57 LVMGroup-LVM--ROOT -> ../dm-2
lrwxrwxrwx  1 root root       7 Jun 18 13:57 LVMGroup-LVM--SWAP -> ../dm-1
lrwxrwxrwx  1 root root       7 Jun 18 13:57 sda5_crypt -> ../dm-0
$
Next step is to request some information about this encrypted volume. You can do this with cryptsetup. Type the command below. You have to give a devicename which was found in the previous step, ‘/dev/mapper/sda5_crypt’ in my example. The output shows the devicename that owns the encrypted volume. Mine is called ‘/dev/sda5’.
Note: in the previous step we found that the name of the encrypted volume also has sda5 in it’s name. It is not sure that the owner of the encrypted volume is also /dev/sda5. I have seen situations where the encrypted volume was named sda4_crypt, but was owned by /dev/sda3. So for the next step, only use the name given by the output below.
$ sudo cryptsetup status /dev/mapper/sda5_crypt
/dev/mapper/sda5_crypt is active and is in use.
  type:    LUKS1
  cipher:  aes-cbc-essiv:sha256
  keysize: 256 bits
  device:  /dev/sda5
  offset:  4096 sectors
  size:    41725952 sectors
  mode:    read/write
$
Last step is to change the password. Note that the command is case sensitive. You are first being asked to enter the old password, next enter the new password twice.
$ sudo cryptsetup luksChangeKey /dev/sda5
Enter LUKS passphrase to be changed:
Enter new LUKS passphrase:
Verify passphrase:
$
The password has now changed. You can continue working. You can use the new password when restarting your system.
Repair or reinstall the Grub Ubuntu loader
If your Grub loader is damaged or if you are used to have Grub installed in the master boot record and want to move it to the boot partition then you have to reinstall Grub. To repair the Grub loader you need the Ubuntu Desktop CD. The alternate CD can also be used, choose ‘Rescue a broken system’ in the main menu. I prefer the Desktop CD now. You have to boot your computer from this CD, mount your boot partition and reinstall grub. You can also you this opration to move Grub to the master boot record if you want to get rid of the Truecrypt loader for Windows.
Start your computer from the Ubuntu Desktop CD, after a while you can choose ‘Try Ubuntu’. Open a terminal by typing ‘terminal’ in the Unity search window. We are looking for the boot partition. Assuming that your harddisk is /dev/sda you should request an overview of all existing partitions with fdisk. Type the command as below. Now find the partition that is quite small and has the Linux partition format. In my case below it is ‘/dev/sda3’.
$ sudo fdisk -l /dev/sda

Disk /dev/sda: 42.9 GB, 42949672960 bytes
255 heads, 63 sectors/track, 5221 cylinders, total 83886080 sectors
Units = sectors of 1 * 512 = 512 bytes
Sector size (logical/physical): 512 bytes / 512 bytes
I/O size (minimum/optimal): 512 bytes / 512 bytes
Disk identifier: 0x46bc5416

   Device Boot      Start         End      Blocks   Id  System
/dev/sda1   *        2048      206847      102400    7  HPFS/NTFS/exFAT
/dev/sda2          206848    41945087    20869120    7  HPFS/NTFS/exFAT
/dev/sda3        41945088    42151935      103424   83  Linux
/dev/sda4        42153982    83884031    20865025    5  Extended
/dev/sda5        42153984    83884031    20865024   83  Linux
$
We need to mount the boot partition in a boot directory. First create a boot directory inside the ‘/mnt’ directory. Next mount the boot partition to the ‘/mnt/boot’ directory.
$ sudo mkdir /mnt/boot
$ sudo mount /dev/sda3 /mnt/boot/
$
Last step is to install grub to the boot sector of the boot partition. Usually you install Grub to a master boot record, but that place is occupied by the Truecrypt loader. Grub give two warnings which you can ignore. Don’t confuse warnings and errors. Errors are mostly show stoppers, warnings don’t. Type the command below to install Grub. The ‘/dev/sda3’ gives access to the boot sector in the partition, ‘/mnt’ gives Grub access to grub configuration files in the boot partition we just mounted.
$ sudo grub-install /dev/sda3 --root-directory=/mnt/ --force
/usr/sbin/grub-setup: warn: Attempting to install GRUB to a partitionless disk or to a partition.  This is a BAD idea..
/usr/sbin/grub-setup: warn: Embedding is not possible.  GRUB can only be installed in this setup by using blocklists.  However, blocklists are UNRELIABLE and their use is discouraged..
Installation finished. No error reported.
$
Note: If you want to install Grub in the master boot record then remove the number after the devicename. Use something like ‘sudo grub-install /dev/sda –root-directory=/mnt/’. You don’t need the force option. Remind that this will disable other boot loaders like Truecrypt.
Now you can reboot your system and you should be able to start Ubuntu using the Esc key in the Truecrypt loader.
Cleanup old kernels when the boot partition is small
If you installed Ubuntu using this guide then your boot partition will be around 100 MB. The nasty side of this is that the boot partition is quite small. In my case 37 MB of space was used for just 1 kernel. When upgrading to a newer kernel 65 MB of space is used. This is fine, but before you upgrade to the third kernel you have to remove the oldest one. Let’s check it out.
First, lets check the diskspace of the boot partition. Note that I currently have 2 kernel images installed. My boot partition is ‘/dev/sda3’. If you don’t know what your boot device is just type the ‘df -h’ and it will show up. I have just 31 MB of free space available at the moment.
$ df -h /dev/sda3
Filesystem      Size  Used Avail Use% Mounted on
/dev/sda3       100M   65M   31M  69% /boot
$
Find the current version of the kernel. Remember the version number.
$ uname -r
3.2.0-25-generic-pae
$
Find all installed kernel versions with the command below.
$ dpkg -l | grep linux-image
ii  linux-image-3.2.0-23-generic-pae       3.2.0-23.36                             Linux kernel image for version 3.2.0 on 64 bit x86 SMP
ii  linux-image-3.2.0-25-generic-pae       3.2.0-25.40                             Linux kernel image for version 3.2.0 on 32 bit x86 SMP
ii  linux-image-generic-pae                3.2.0.25.27                             Generic Linux kernel image
$
Now remove all the versions lower than the current version. My current version was 3.2.0-25, so I only have to remove 3.2.0-23. To remove it type the command below. There is a lot of output, that’s because the Grub config is updated. You will be requested to confirm the deletion of the package, enter ‘y’ to confirm this.
Note 1: Only lower versions must be deleted!
Note 2: If you find a higher version number, you have probably installed a newer kernel. Reboot to activate the newer kernel and remove the older ones.
$ sudo apt-get purge linux-image-3.2.0-23-generic-pae
Reading package lists... Done
Building dependency tree
Reading state information... Done
The following packages will be REMOVED:
  linux-image-3.2.0-23-generic-pae*
0 upgraded, 0 newly installed, 1 to remove and 11 not upgraded.
After this operation, 113 MB disk space will be freed.
Do you want to continue [Y/n]? y
(Reading database ... 168782 files and directories currently installed.)
Removing linux-image-3.2.0-23-generic-pae ...
Examining /etc/kernel/postrm.d .
run-parts: executing /etc/kernel/postrm.d/initramfs-tools 3.2.0-23-generic-pae /boot/vmlinuz-3.2.0-23-generic-pae
update-initramfs: Deleting /boot/initrd.img-3.2.0-23-generic-pae
run-parts: executing /etc/kernel/postrm.d/zz-update-grub 3.2.0-23-generic-pae /boot/vmlinuz-3.2.0-23-generic-pae
Generating grub.cfg ...
Found linux image: /boot/vmlinuz-3.2.0-25-generic-pae
Found initrd image: /boot/initrd.img-3.2.0-25-generic-pae
Found memtest86+ image: /memtest86+.bin
done
The link /vmlinuz.old is a damaged link
Removing symbolic link vmlinuz.old
 you may need to re-run your boot loader[grub]
The link /initrd.img.old is a damaged link
Removing symbolic link initrd.img.old
 you may need to re-run your boot loader[grub]
Purging configuration files for linux-image-3.2.0-23-generic-pae ...
Examining /etc/kernel/postrm.d .
run-parts: executing /etc/kernel/postrm.d/initramfs-tools 3.2.0-23-generic-pae /boot/vmlinuz-3.2.0-23-generic-pae
run-parts: executing /etc/kernel/postrm.d/zz-update-grub 3.2.0-23-generic-pae /boot/vmlinuz-3.2.0-23-generic-pae
$
Now if you check the disk space of the boot partition again, you find that more space is available now. 58 MB of space is available now while it was 31 MB before.
$ df -h /dev/sda3
Filesystem      Size  Used Avail Use% Mounted on
/dev/sda3       100M   37M   58M  39% /boot
$
Now you can safely upgrade to a newer kernel image. This cleaning process must be done every time you upgrade to a kernel version to prevent that the boot partition is out of space. If you’re tired cleaning old kernel images because of the small partition size, you have to find any free space on your disk or pre-partition it and start a re-installation.

Leave a Reply