Yubikey for WordPress, Roundcube and Linux
Yubico-PAM module for authentication in Linux
To use the Yubikey for authentication in Linux use the Yubico-pam module. Pam (pluggable authentication modules) is the authentication system for Linux. Pam uses modules and libraries to allow the system and applications to authenticate. The Yubico-pam module allows the user to authenticate in Linux using the Yubico authentication servers. The module allows advanced authentication including ldap configurations and offline authentication. More information about the possibilities can be found on the Yubico-pam github wiki. I will only cover authentication using the YubiCloud. This has the limitation that the Linux system must have an Internet connection before the user is authenticated. If the Yubico servers can’t be reached by the lack of an Internet connection, the authentication will fail and users cannot login depending on the configuration. So please take care…
Preparations: Get Yubico API Key
The Yubico-pam module needs access to Yubico servers for authentication. Yubico accepts authentication-requests only when the authentication data is provided with an valid ID and API key. These two can be obtained on a Yubico website for API Key requests. The URL to get the API key is https://upgrade.yubico.com/getapikey.
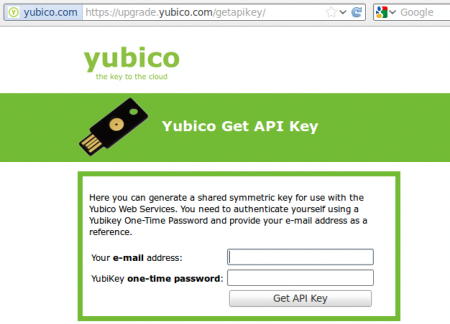
Visit the ‘Yubico Get API Key’ website on https://upgrade.yubico.com/getapikey. Insert your mail-address and press the touch-button of your Yubikey once to get the API Key and a Client ID. Keep these for later use.
Installation of the Yubico-pam module
The installation if the Yubico-pam module can be done by downloading and compiling the sourcecode from github. This requires a view dependencies. Ubuntu users can also add a repository to use the ready-to-use packages. This avoids compiling and dependency problems. I use Ubuntu 12.04 at the moment and will only handle the addition of the repository and installing the Ubuntu packages. Users of other distributions can download the source code and read the manuals on the Yubico-pam code page.
First step is to add the Yubico-pam repository to your list of repositories. Add these by using the ‘add-apt-repository’ command below. You have to press enter to confirm the repository-change.
$ sudo add-apt-repository ppa:fredrikt/yubico
You are about to add the following PPA to your system:
 A single PPA for all (?) my Yubico/YubiKey/YubiHSM related PPAs.

 More info: https://launchpad.net/~fredrikt/+archive/yubico
Press [ENTER] to continue or ctrl-c to cancel adding it

Executing: gpg --ignore-time-conflict --no-options --no-default-keyring --secret-keyring /tmp/tmp.tWWd52vnKh --trustdb-name /etc/apt/trustdb.gpg --keyring /etc/apt/trusted.gpg --primary-keyring /etc/apt/trusted.gpg --keyserver hkp://keyserver.ubuntu.com:80/ --recv D57968441368AE9FA836D1530C0B9847C7E50642
gpg: requesting key C7E50642 from hkp server keyserver.ubuntu.com
gpg: key C7E50642: public key "Launchpad PPA for Fredrik Thulin" imported
gpg: Total number processed: 1
gpg:               imported: 1  (RSA: 1)
$
Next, update package info from repository’s
$ sudo apt-get update
Ign http://nl.archive.ubuntu.com precise InRelease
Ign http://nl.archive.ubuntu.com precise-updates InRelease
<snap>
Hit http://nl.archive.ubuntu.com precise-backports/universe Translation-en
Ign http://extras.ubuntu.com precise/main Translation-en_US
Ign http://extras.ubuntu.com precise/main Translation-en
Ign http://extras.ubuntu.com precise/main Translation-nl
Ign http://ppa.launchpad.net precise/main Translation-en_US
Ign http://ppa.launchpad.net precise/main Translation-en
Ign http://ppa.launchpad.net precise/main Translation-nl
Fetched 19,3 kB in 0s (22,7 kB/s)
Reading package lists... Done
$
Finally, install the ‘libpam-yubico’ package and it’s dependencies. Confirm to continue the installation.
$ sudo apt-get install libpam-yubico
Reading package lists... Done
Building dependency tree
Reading state information... Done
The following packages were automatically installed and are no longer required:
  gnome-session-bin libjson-glib-1.0-0
Use 'apt-get autoremove' to remove them.
The following extra packages will be installed:
  libykclient3 libykpers-1-1 libyubikey0
The following NEW packages will be installed:
  libpam-yubico libykclient3 libykpers-1-1 libyubikey0
0 upgraded, 4 newly installed, 0 to remove and 0 not upgraded.
Need to get 0 B/111 kB of archives.
After this operation, 360 kB of additional disk space will be used.
Do you want to continue [Y/n]? y
Preconfiguring packages ...
Selecting previously unselected package libykclient3.
(Reading database ... 189030 files and directories currently installed.)
Unpacking libykclient3 (from .../libykclient3_2.7-1~ppa1~precise1_i386.deb) ...
Selecting previously unselected package libyubikey0.
Unpacking libyubikey0 (from .../libyubikey0_1.7-1_i386.deb) ...
Selecting previously unselected package libykpers-1-1.
Unpacking libykpers-1-1 (from .../libykpers-1-1_1.6.4-1~ppa1~precise1_i386.deb) ...
Selecting previously unselected package libpam-yubico.
Unpacking libpam-yubico (from .../libpam-yubico_2.11-1_i386.deb) ...
Processing triggers for man-db ...
Setting up libykclient3 (2.7-1~ppa1~precise1) ...
Setting up libyubikey0 (1.7-1) ...
Setting up libykpers-1-1 (1.6.4-1~ppa1~precise1) ...
Setting up libpam-yubico (2.11-1) ...
Processing triggers for libc-bin ...
ldconfig deferred processing now taking place
$
Configuring and enable the Yubico-pam module
Now the software is installed. Next step is to configure and enable the software. When the module is configured using the default settings you are required to use the Yubikey for authentication. When you mis-configured the system you have the risk that authentication will fail and you will be locked out your system. Although this can be repaired using a live-cd to repair the PAM files I advise you to have a root-shell open while you test your configuration in another window. If authentication fails, you can repair it from the existing root-shell. Enter the command below to configure the Yubico-pam module.
$ sudo dpkg-reconfigure libpam-yubico
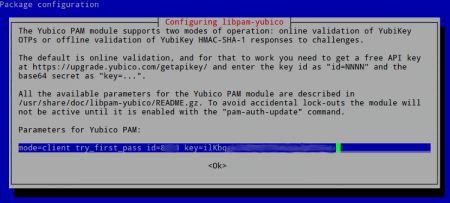
Insert the client ID and API-Key. These have been previously received using https://upgrade.yubico.com/getapikey/. Press ‘Ok’ to continue.
Note: The API-key is base64 encoded. When it contains a slash ‘/’ it crashes the configuration process. Workaround is to configure PAM manually, or request a new API-Key which doesn’t contain the slash. Manual configuration is explained in the documentation which is included in the package.
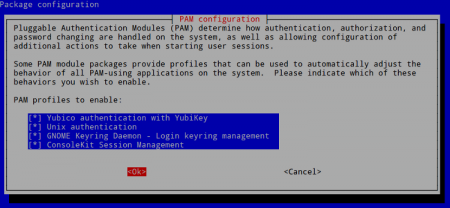
Enable ‘Yubico authentication with Yubikey’ and select ‘OK’ to continue. The configuration will now be active.
Last configuration step is to assign a Yubikey Key to your profile. There is a possibility to have a central configuration file which contains all users and their Yubikey’s, but I will follow the default configuration which assumes that every user has a file containing the Yubikey-ID in their homedirectory. Create a file named ‘.yubico/authorized_yubikeys’ in the home-directory. The file must only have one line: <user name>:<Yubikey token ID>:<Yubikey token ID>. The ‘Yubikey token ID’ are the first 12 characters when pressing the Yubikey touch-button. Mine looks like this: (Note that I hide my personal key)
maarten:cccc********:cccc********
The configuration is now finished, you are ready to test it all!
Examples using the Yubico-pam module
The Yubico-pam module integration is good. Ubuntu, Xubuntu, sudo and SSH all acceptes the Yubikey. Most of the applications request the yubico OTP first. Exception is SSH which requires the user-password directly followed up with the Yubikey OTP code, all on the same line.
Ubuntu 12.04 login using Unity greeter:
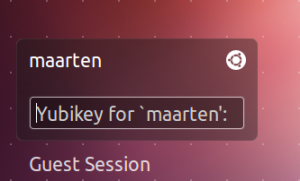
The Yubikey OTP code is requested first, press the touch-button
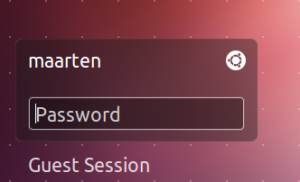
Next, enter the password related to the user account
Xubuntu has another look, but authentication is the same.
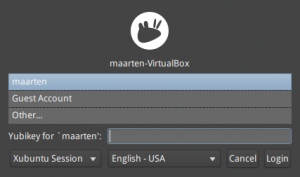
First enter the Yubico OTP pressing the touch-button
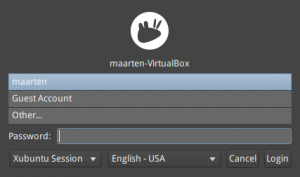
Next, enter the user-related password
The graphical sudo functions also accepts the Yubikey authentication.
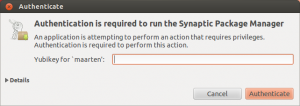
Yubikey authentication is requested first
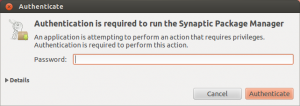
Password is requested afterwards
sudo command in a terminal asks twice for authentication. First, enter the Yubikey touch-button. Next, enter the password.
$ sudo bash
Yubikey for `maarten':
[sudo] password for maarten:
#
SSH is somehow complicated. It requires two factor authentication but require both of them in the same field. Enter the user’s password first, attach the Yubikey OTP code afterwards.
$ ssh maarten@10.0.2.15
maarten@10.0.2.15's password:
Welcome to Ubuntu 12.04 LTS (GNU/Linux 3.2.0-26-generic i686)

 * Documentation:  https://help.ubuntu.com/

Last login: Fri Jul 20 15:06:29 2012 from ubuntu.local
$

Leave a Reply